Friday, December 18, 2015

"Beautiful Blossoms" Card Kit Workshop

So...WHAT ELSE can you do with a super cute card kit?  Turn it into multiple projects, that's what!  :)  Just one BEAUTIFUL BLOSSOMS card kit was used with a few extra supplies to create a complete layout including a scrapbook page, basic greeting card, a post-it note holder with velcro closure, a skinny gift card pouch, and a treat bag containing a mini bag of your favorite treat (mine is kisses...ALWAYS Hershey's kisses!  LOL!)

More details are coming soon and you will be able to purchase the cutting instructions very inexpensively, so stay tuned!  :)


Wednesday, November 11, 2015

November Club Projects "White Pines" Layouts

I am LOVE LOVE LOVING Close To My Heart's WHITE PINES Workshop on the Go kit.  Beautiful for Christmas, but a fun twist with the addition of the Glacier Blue color.  Finished off beautifully with the small, adorable accents from the WHITE PINES COMPLEMENTS pack - great clear and Kraft shapes for those final touches.

Click these links to see some of the products used to create this layout:


The "Holidays" title was cut from the Exclusive Close To My Heart "Artbooking" cartridge, cut at 3", which is a perfect size for this title.  The 'happy' behind it was stamped in Cranberry onto a sticker label from the White Pines Complements pack.  When adhering thin titles like this where a tape runner might be too big and tricky, grab our Bonding Memories Glue Pen instead, and literally draw the liquid glue where you need it.  A must-have tool for those small paper pieces.  :)


These adorable kraft trees also came from the White Pines Complements pack.  When adhering, simply put adhesive along the bottom part of the tree, so that a photo can be added to the mat later and slipped behind the top part of the tree.


More cuteness from the Complements pack (I tell you, this is SUCH a great deal for just $5.95/pack!  I added a tiny red gem from the Workshop kit onto the reindeer, and added the 'celebrate' word with some liquid glue behind the letters so they wouldn't show.


This is the second layout my club members are creating this month from the same White Pines workshop kit.  This one has no photo mats, which I do often, so that they have tons of flexibility in adding photos and journaling later to suit their needs.  Did I already tell you that I LOVE this paper?  Because I do.  I really do.  :)


The "Merry" title is also cut from the Cricut "Artbooking" cartridge at 3".  Only add a little adhesive so that you can slip the Christmas accent behind it.  That was stamped from the stamp set included in the kit, and then just cut out the word Christmas.  Stamps are SO versatile for things like this.  Sponge in Cranberry ink with a sponge and you have a simple but eye-catching title.  :)


The fern leaves were stamped and finished off with a cute badge button (also in the workshop kit) instead of holly.  A Cranberry strip of cardstock with a ribbon-cut edge makes a really nice border.


This is my favorite stamp from the Workshop Kit stamp set.  Simply Cricut-cut from the new "Artistry" cartridge, according to the directions on the stamp set (page number and size are printed right on the stamp set that has the matching image, so there's no guesswork on where to find it, or what size to cut it to fit!).  Then ink up the stamp using our Fern stamp pad, and finish it off with more red gems from the kit.  This stamp is also adorable on gift tags and cards for the holidays.  :)


Thursday, October 8, 2015

October "Sangria" Club Projects (2 Layouts, 2 Cards)

I love Close To My Heart's new "Sangria" paper and coordinating products.  These are REALLY simple projects my club members will be creating in October...two layouts and two cards.  (I LOVE the cards!)  All of the papers and embellishments came from the SANGRIA WORKSHOP ON THE GO KIT and the SANGRIA COMPLEMENTS.  I also used the following stamp pad colors:  Cocoa, New England Ivy, and Goldrush.  The additional stamp sets used were B1492, Fallen Leaves and C1632, Say It All (available as a hostess rewards set).  

The vine was cut on "Eggplant" cardstock from the workshop kit, using the new CTMH Cricut Artistry Cartridge. Cut two and then overlap on both pages to pull them together.


This is a simple five-minute layout...just piece papers together and finish with a little stamping and matching Kraft complements.  Add your title, photos, and journaling and you're done.  :)


I just adore these cards, and the best part is - they came from scraps leftover from the two layouts above, so they were super easy to put together.  Stamp the leaves in New England Ivy and 'fussy cut' out, then sponge Goldrush Ink onto the edges to add a little more dimension.  Then stamp any tiny sentiment you'd like to finish it.  :)


Thursday, October 1, 2015

AWESOME October Specials

Happy October, my friends!  Super excited to share two AWESOME specials with you.

The first is the October Stamp of the Month...$17.95, or only $5.00 with your $50+ order.  Great savings!  You'll notice that some of the stamp images have a red outline...that just means that there is a Cricut cut to match.  This stamp set specifically coordinates with our exclusive Cricut "Artiste" cartridge...a versatile one with 700, YES 700 cuts!

Click Here for the October SOM on my site:
 

The other bonus is for those considering joining CTMH as a consultant.  Get this super cute bag (all of our consultants attending the summer convention got this!), and it's FREE in your October consultant kit.  It's just $129 to join and your kit contains over $400 of product.  Click HERE to see a picture of what comes in the kit, a printed list, and see a link to sign up if and when you're ready.  It's all done online...so easy!


Monday, September 28, 2015

Three Awesome Stamp Sets!

Beautiful Artwork with THREE Exclusive Stamps 
(available only thru this Wednesday, Sept. 30th!)  
Click HERE to check them out!  :)

Here is one of the cards featured - click the link above to see more.  I love how simple and cute this is...the 'swipe' in different colors is actually a STAMP...just ink it up in your colors of choice to make a beautiful card front.  And if you don't want to stamp or cut out your words as shown here, know that you can also just stamp in black or another dark color right on top of the lighter stamped swipe and it will show up nicely.

Seriously, I'm in love with the swipe of this stamp!  You can purchase this on my website at http://janene.ctmh.com/, but only through Wednesday, so don't wait!  :)

Click HERE to see the "Hello Life" stamp set trio - buy each set individually for only $13.95, or get all three and save about $7.00!  By the way, the swipe stamp is included in the "Pocket Scrapbooking" stamp set.  So adorable!

Janene


Saturday, September 12, 2015

36 Minutes of Studio J!

Have you wondered about Studio J?  What is it?  How do you use it?  How hard is it do create super-cute digital layouts?  How much does it cost?  Well, if you have 36 minutes, you can watch this video and learn most of the ins and outs of using this AMAZING program from Close To My Heart.  You do NOT have to be a technie, computer whiz, or know a single thing about this program to create awesome, fast layouts in Studio J. 

After watching this video, you'll know all of the basics of using Close To My Heart's awesome Studio J program, and you'll see me create an entire layout with photos, a title, journaling, and embellishments.  If I were doing this on my own without talking or teaching, you could create this layout in less than 15 minutes, easy.  I promise!  It feels SO good to be able to create layouts really fast, and I especially like that I can create a finished layout on the SAME DAY I took the pictures, while the memories and details are fresh in my mind. 

 You don't need any supplies except you computer and an internet connection...it's free to use, no software to download, no memberships to sign up for.  Seriously people, it's free.  The only thing you pay for is the printed layout when you're ready to place an order, and as soon as you have four layouts created - you can place your order (layouts are only $.695, so basically $3.49 per page - awesome when you consider the cost of cardstock, pattern papers, photo printing, ribbons, embellishments, etc.  Not to mention the time!).  The other cool thing is the shipping is a flat fee of $5.95, so whether you order 4 layouts of 50, you can get them all in one box for just $5.95.  Oh yes, and when you order your layouts, you'll also get jpg images emailed to you of the finished layouts, so you can share them via social media, email them to family members, or save for future use.  That's just a free bonus included in the $6.95 price.  WOW!!

Just go to my site HERE and click on 'Products' and 'Studio J' to sign up with a username and password.  You can start creating your first layout in about a minute.  Woohoo!  Watch the video here, or open it in Studio J, then go try creating your first layout.  It's SO much fun, and something you and your teenagers can do to really easily. 


Monday, August 31, 2015

The New Idea Book Is HERE!!

Exciting!  It's just past 11:30pm, and in a few short hours, the brand new Close To My Heart Annual Inspirations Idea Book will be live and open for shopping!  Woohoo!  In addition, the seasonal "Holiday Expressions", featuring holiday products for Halloween, Thanksgiving, and Christmas/Winter will also be unveiled.  I just LOVE this time of year, and can't wait to share so many new products with you!  :)

A quick note - we do still have the Stamp of the Month program, however, these will no longer be featured in the Annual Inspirations Idea Book.  They will now be shown in the Seasonal Expressions mini publication during the months they are featured.  Here's the schedule:

Holiday Expressions:  Sept - Dec
Seasonal Expressions 1:  Jan - April
Seasonal Expressions 2:  May - August

Guess what?  When you place an order on my website starting September 1st, you'll receive a prompt to add a FREE Holiday Expressions to your order.  You'll also be able to add the big Annual Inspirations to your order as well, and have a new one shipped right to your door with your order.  It's just awesome!

September Specials:

September is National Stamping Month, and you can get THREE exclusive stamp sets with no qualifying order.  There is one for scrapbooking, cardmaking, and pocket scrapbooking, and all three coordinate with cuts from the new Cricut 'Artistry' cartridge, found HERE.  How cute are these stamp sets???  Buy them each individually for just $13.95 each, or buy all three for just $34.95 and save money!  :)  These are super cute C-size sets and they'll be a fun addition to your stamps.  :)


I'm leaving town Tuesday for a family funeral, but will be back Thursday and ready to share more fun things with you!  Be watching, and feel free to go check out all of the new products on my website at www.janene.ctmh.com.   You can also view the Idea Books online page by page by going to my site and then clicking on "Products" and "Idea Books".  Shop anytime - exciting!!!

Janene Wawro
www.janene.ctmh.com
www.createwithjanene.com


Friday, August 21, 2015

Quick & Easy 5-Minute Card!

This is a cute and simple card I recently created.  Add it to your files when you need a cute but quick card, as the card dimensions are right there for you!  Substitute different colors and stamps to make exactly what you want for any occasion, but the instructions below will give you links to these products on my website at www.janene.ctmh.com to see them up close.  Feel free to purchase anything you don't have.  :)


1) I started by using a standard card base (CTMH has an awesome value pack where you get 50 cards and 50 envelopes for just $14.95, or $.30 per card/envelope - wow!).  Click HERE to see the value pack.

2) Next, adhere your black cardstock to the center of the card.  Black cardstock can be found HERE

3) Layer the gray pattern paper in the center of the black cardstock.  This paper comes from the new "Nevermore" paper pack which will be available on September 1st, so search it on the 1st on my website!

4) Add the pink Paper Fundamentals paper next.  This came from the Whimsy pack, which can be found HERE.  This paper is fun because one side has the pattern mixed with white, and the other side is solid with a raised embossed design.  Adorable!

5)  The final step to finish the card is to cut a 1-3/4" circle (I cut it on my Cricut), and sponge Pixie ink (found HERE) all around the edges with a sponge.  Then stamp your saying in Black ink (found HERE).  I used the August 2015 Stamp of the Month (found HERE), but buy it quickly because it's gone after August 31st!  $17.95, or just $5.00 with a $50.00 order - GREAT DEAL!  Add a couple of Bitty Sparkles (found HERE) as your finishing touch.  Since these are REALLY tiny, cute sparkles, I don't try placing them with my finger, but instead, lift them off their carrier sheet with our Piercing Tool (found HERE) and then placing it where I want it.  Great tip and perfect placement every time.  Then adhere it with some foam tape (found HERE) to lift it off your card for nice dimension.

Enjoy your card-making!

Janene  :)

Friday, August 14, 2015

"Seaside" Scrapbook Workshop

I love Close To My Heart's "Seaside" papers and matching products.  The workshop kit is fantastic and I love all of the elements.  :)  These papers would be perfect for any vacation-beach-travel papers, but also for water parties, summertime, and fun in the outdoors.  Jump in and play!  Click HERE to see the Seaside products on my site, and if you like anything, buy it now, as this will be gone on September 1st, 2015, or until supplies run out.  :)

These are all of the projects my scrapbook club members are creating in August.  Here is the first layout we created.  Everything has a mat in 'Desert Sand' or 'Sorbet', both colors from our Exclusive color palette. 


Left layout page 


Right layout page

This is a close-up of the title...it's actually a big sticker from the Seaside Complements pack, and accented with some cute metal starfish from the Seaside Assortment.

This is the second layout my scrapbook club members are creating this month.  My favorite thing about this layout is the ink distressing on everything.  Grab a Chocolate stamp pad and sponge and start swiping all of the edges.  It adds a ton of character and visual interest.  

Left layout page

Right layout page

Close up shot of the title...the saying is stamped from a cute stamp in the Seaside Workshop on the Go kit, and matted with Seaside paper behind.  The ribbons are just 1/2" strips of cardstock, and zip strips from our B&T Duos pattern paper.  Ink distress those as well, and put them behind your title.


I like to use pop dots or foam tape on my layouts to lift things off the page and add dimension.  This accent is cute...just two layered circles, cut from the Cricut, and stamped with another stamp from the Workshop on the Go kit.  More paper ribbon accents below, and really cute adhesive dots to finish it.  So stinkin' adorable.  You'll also notice that 
my layouts are always wide open with lots of room, so that you have lots of flexibility in how and where you put your photos and journaling.


As a bonus, we are making two cute mini cards with leftover papers.  The base of these cards starts with a 3 1/2 x 7" piece of cardstock folded in half to make two 3 1/2" square cards.  Layer B&T pattern paper (distressed in Chocolate, of course) and finish with really cute embellishments.  The stamped frame and sentiment comes from the August Stamp of the Month set, found by clicking HERE.  It's only available in August, so grab it soon before the month ends.  :)

Wednesday, August 5, 2015

Brand New Products to PLAY with!

OOOOOH, I love August!  It's the 'Consultant Preview' month for all CTMH Consultants to see all of our new products and order and play with them, in preparation to show them to our friends and customers on September 1st when the NEW annual Idea Book is unveiled.  However - SO COOL - this year, CTMH is giving YOU a sneak-peek at some of our upcoming products and letting you order them early right along with consultants.  So fun!  Check out the flyer showing all of the fun new things you can play with!  (BTW, I'll be teaching with the new "Zoe" products in September!)


This is the August Stamp of the Month.  It's one of my all-time favorites, as it's SO versatile for so many things...holidays, seasons, and sentiments are covered here, and the best part is, they all fit into the three shape stamps included to make perfect frames for your sentiments!  Plus...anytime you see a red outline on any CTMH stamps like those shown, it means that that particular stamp image has a coordinating Cricut cut - so just cut the shape out on your Cricut and stamp the image inside...no cutting needed!  :)  This stamp set coordinates with the NEW Cricut "Artistry" collection (shown on the flyer in this post).  This ONE Cricut cartridge gives you 700, yes...700, different images, plus THREE matching stamp sets, AND a full pack of cardstock - 10 colors, 2 of each color, for a grand total of just $99.  WOW!  What an incredible deal, especially considering your average new cartridge with about 80 images is around $50!  And for the first time, you can also get a digital version of the cartridge for $79 - save $20.


To shop for any of these items in August, simply go to my website at http://janene.ctmh.com/ and click "Join" next to my August Mystery Hostess online event.  Everyone who shops through this link will be entered into a drawing for ALL of the free hostess gifts from everyone who orders.  WOW!  After clicking the link, simply enter order numbers or descriptions into the 'search' box to find them, and add them to your cart.  :)

And finally, have you tried Studio J digital scrapbooking yet?  Wow...am I so hooked!  Remember that I give 1-hour FREE lessons to local friends and customers.  I sit at your computer or mine and help you put together your very first Studio J two-page layout.  By the end of the hour, you'll know all of the basics to using this free program.  Yes, it's FREE!  No membership to pay, no software to buy or download - all you need is an internet connection and your photos.  :)  I love both digital and traditional scrapbooking, but there are some really cool things you can do with digital scrapbooking that you can't do as easily with traditional.  Here's an example - this layout took me about 20 minutes to complete start to finish...I just chose a template and paper, then did a drag-n-drop for my photos and journaling.  You'll love how easy it is!


Notice in this layout how BIG the square picture is on the left!  Do you know how much I'd have to pay to print a large, custom print for my scrapbook?  With Studio J, the only thing you pay for is the printed layout when you decide to buy it.  The price is amazing...just $6.95 for a 2-page layout, so it's less than $3.50 per page.  And there's no supplies needed - no paper, trimmers, adhesives, nothing...just your computer and uploaded photos to create!  Let's talk - I promise you'll love how easy it is to use, totally user-friendly, and your pages come out AMAZING!!!!!


Monday, July 20, 2015

4th of July Flip Flap Layout!

I LOVE Flip Flaps, and I have many packages in every size.  It is one of the most FUN products Close To My Heart carries - adding visual interest when pictures and journaling pop off the page using flips and flaps.  It's also the perfect way to add extra room for photos without having to create multiple layouts of the same event.  Just stick on some flip flaps.  So versatile!

I promoted this layout for great 4th of July photos, but the color scheme and stars work perfectly for Back-To-School photos as well, so I intentionally left off a title.  This way, my club members creating these this month can choose what they'd like to do with the layout.  The star shapes were all cut from the exclusive CTMH "Art Philosophy" cartridge - 700 images! - using the chunky star and overlay shown on page 49 of the booklet.  Adorable!

If you haven't played with CTMH Flip Flaps before, check them out HERE!  This is the package I used for the 12" ones in this layout, but if you go to www.janene.ctmh.com and type 'Flip Flaps' in the Shop/Search box, you'll see all the sizes we carry.  The 4x6 ones are one of my biggest sellers, as they hold standard size photos perfectly.

Here is the layout CLOSED - with TONS of open space for photos and journaling:


Here is the layout OPEN - you'll notice the the left page title flap flips up, as well as both sides of the right page, revealing another 24" of scrapbook space with the addition of flip flaps.  Seriously, if you don't own these, go get some...all packages are less then $5.00!


GREAT TIP!  With some of our remaining scraps, I created two simple cards on white bases.  Here's a tip I use A LOT to save paper:  Instead of getting two standard size cards from one sheet of 12x12 paper (4-1/4 x 5-1/2 size), simply make your card 1/4" smaller, and make your cards 4 x 5-1/2" instead.  The easiest way to do this is cut your 12x12 cardstock paper base at 11", then turn it and cut three 4" strips (4 x 11).  Then fold all three in half to create your 4 x 5-1/2 card bases).  You can use the same standard envelopes you normally would, but you have very little paper waste.  :)


The main Products used were Adventure Paper Fundamentals and Adventure Cardstock, matching red and blue ink, and the super cute "Doodled Designs" stamp set - just $6.95!  Plus the 12" Flip Flaps from the link above, and mounted on standard 12x12 Top Loading Memory Protectors.  All projects topped off with cute White Enamel Stars adhesive already on the back, just peel and stick!  :)


Friday, June 12, 2015

June 2015 Club Layouts, "Jackson"

You know how sometimes you see papers online or in a catalog and think, "Eh.  That's just okay."?  But then you see it in real life and absolutely fall in love?  Well, that's me with the Close To My Heart 'Jackson' paper line.  I LIKED it, but didn't love it until I started playing with it.

Um.  Super cute and versatile!

Here are the layouts that my club members get to create in June using our standard club which, consisting of the Jackson Workshop On The Go kit and the matching Jackson Complement stickers - tons of products are included in the kit...cardstock, BT (Background/Texture pattern paper), an exclusive stamp set you can't purchase anywhere else, two adhesive embellishments, and a bonus workshop guide.  Simply click the links above to purchase these two items.

We usually have one regular layout and one 'quick' layout, to remind ourselves that not every layout needs to have bells and whistles.  If you have great color, coordinating products, and space for photos and journaling, you'll be great!  :)

 Here is the first, main layout:


Left Page, with a Barn Red photo mat, perfect for a 5x7 picture!


Close up of pocket embellishment.  Simply cut 1" strips of Colonial White cardstock, grab a sponge and Chocolate stamp pad, and distress!  (Tip - the Colonial White featured in this layout is cut 11x11 and mounted on Cocoa cardstock, so you have 1" strips already!)  Scissor cut the ends and add adhesive arrow stickers from the workshop kit above.  The 'Notes' piece is also a sticker from the Complements package.  Attach it to the Juniper piece of cardstock, then attach that to the BT paper using our Mini Stapler - just leave the top 'pocket' open.  Then add another round of staples along the bottom and right edge only - don't adhere the whole piece down - so that if you have a 5x7 photo to include on the Barn Red photo mat, you can slide it under the pocket.


I love this look - a simple strip of the striped B&T paper included in the kit can look like a sign post, simply by distressing with a sponge and Chocolate stamp pad.  The phrases are all stickers from the Complements sheet.  So easy!

  
Right Page, with two Barn Red photo mats, ready for your 4x6 pictures!


Second, 'quick' layout.  No photo mats, just lots of wide-open space for you to add photos and journaling anywhere you'd like.


Left page, featuring a sticker from the Complements sheet and two pieces of BT matched in the center, with outside corners rounded.  Top is a 1/2" 'zip strip' cut from our BT.


Our 'Captured Memory' title piece is another sticker from the Complements sheet, with the outside edges notched and scissor cut, layered on Barn Red cardstock.  It's also lifted off the page with our 3D Foam Tape for added dimension, and finished off with cute arrow stickers below.


Right page, featuring the same zip strip and paper dimensions.


An eye-catching embellishment group will add a lot to a simple layout.  The two tickets are stickers from the Complements included, and mounted on Barn Red cardstock.  Finish off with really cute aztec sticker embellishment and a metal compass, all included in the Workshop kit!

You can purchase a 1-page pdf handout for this workshop, which includes all of the paper cutting sizes for both layouts, photos of the basic layouts, and a few tips on assembly for just $3.00.  Simply click the "Buy Now" button below and it will be emailed to you.

Friday, May 15, 2015

"Blossom" Club Projects - May 2015

I'm absolutely in love with the brand new "Blossom" paper from Close To My Heart (found HERE).  I decided to create a couple of really simple cards and a fun, easy, interactive scrapbook layout to feature these beautiful products.  My monthly club members get to create these projects during the month of May.  Enjoy!

This is the two-page layout.  The left page design comes from our "Reflections" How-To guidebook (look up the 'Front Center-Mosaic' template), which you can purchase HERE.  Our how-to books are fantastic, as the page design is there, along with cutting sizes and full-color page examples.  A MUST for all scrapbookers!


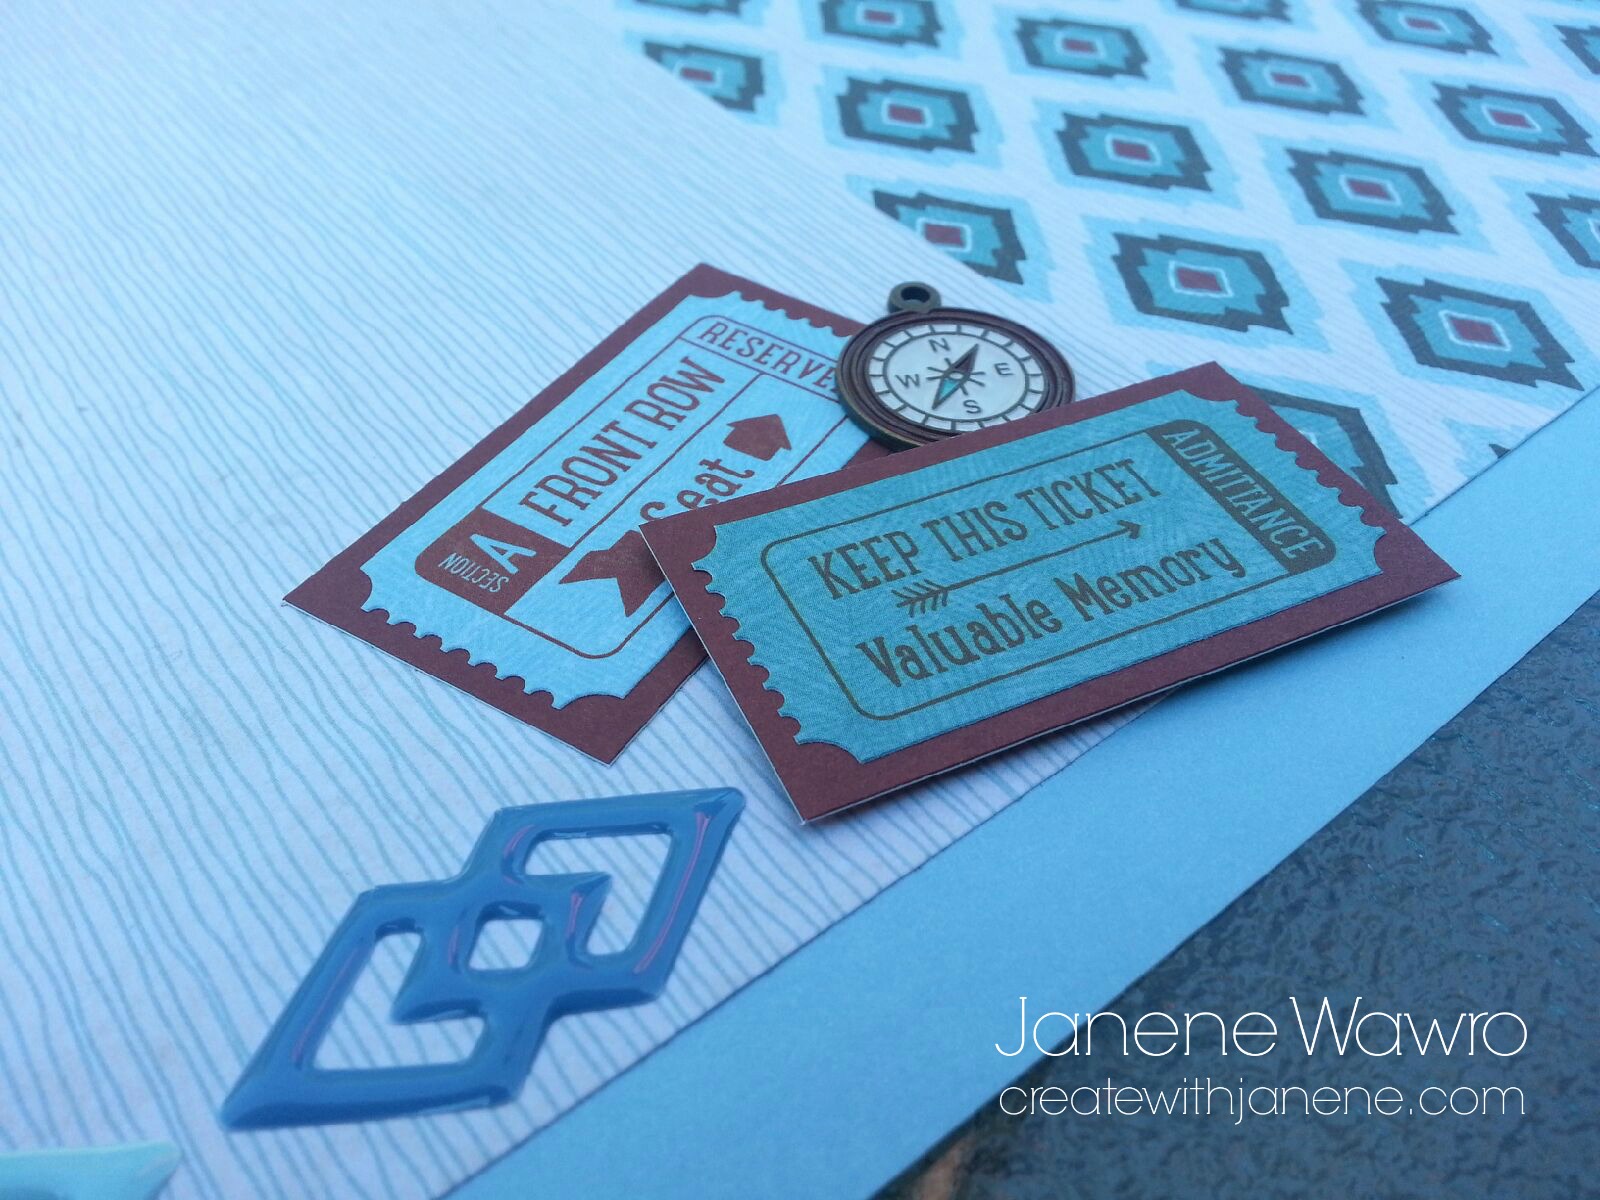
The right hand page is one of my FAVORITE things to do when I have a lot of pictures to scrapbook, but don't want to make multiple pages and layouts.  The base of this is a clear pocket page protector, with horizontal pockets to slide 4x6 pictures, decorated papers, and Picture My Life cards in to make FAST scrapbook pages.  You can find this product HERE.  With this ONE page protector, you have room for six items to tuck in each 4x6 slot.  Here comes the fun part!  Check out the next picture...


Here's a technique for making each of the six slots interactive, AND adding a ton more space for more pics and journaling.  Simply cut a 4x12 strip of cardstock, fold in half at 6", and slide the bottom half into the pocket.  This will leave the top half outside the pocket as an extra flap.  Decorate as desired, but now instead of room for ONE 4x6 item, you have THREE.  This now gives you a total of eighteen 4x6 areas for photos, journaling, or Picture My Life cards (found HERE), all on one page.  Perfect!


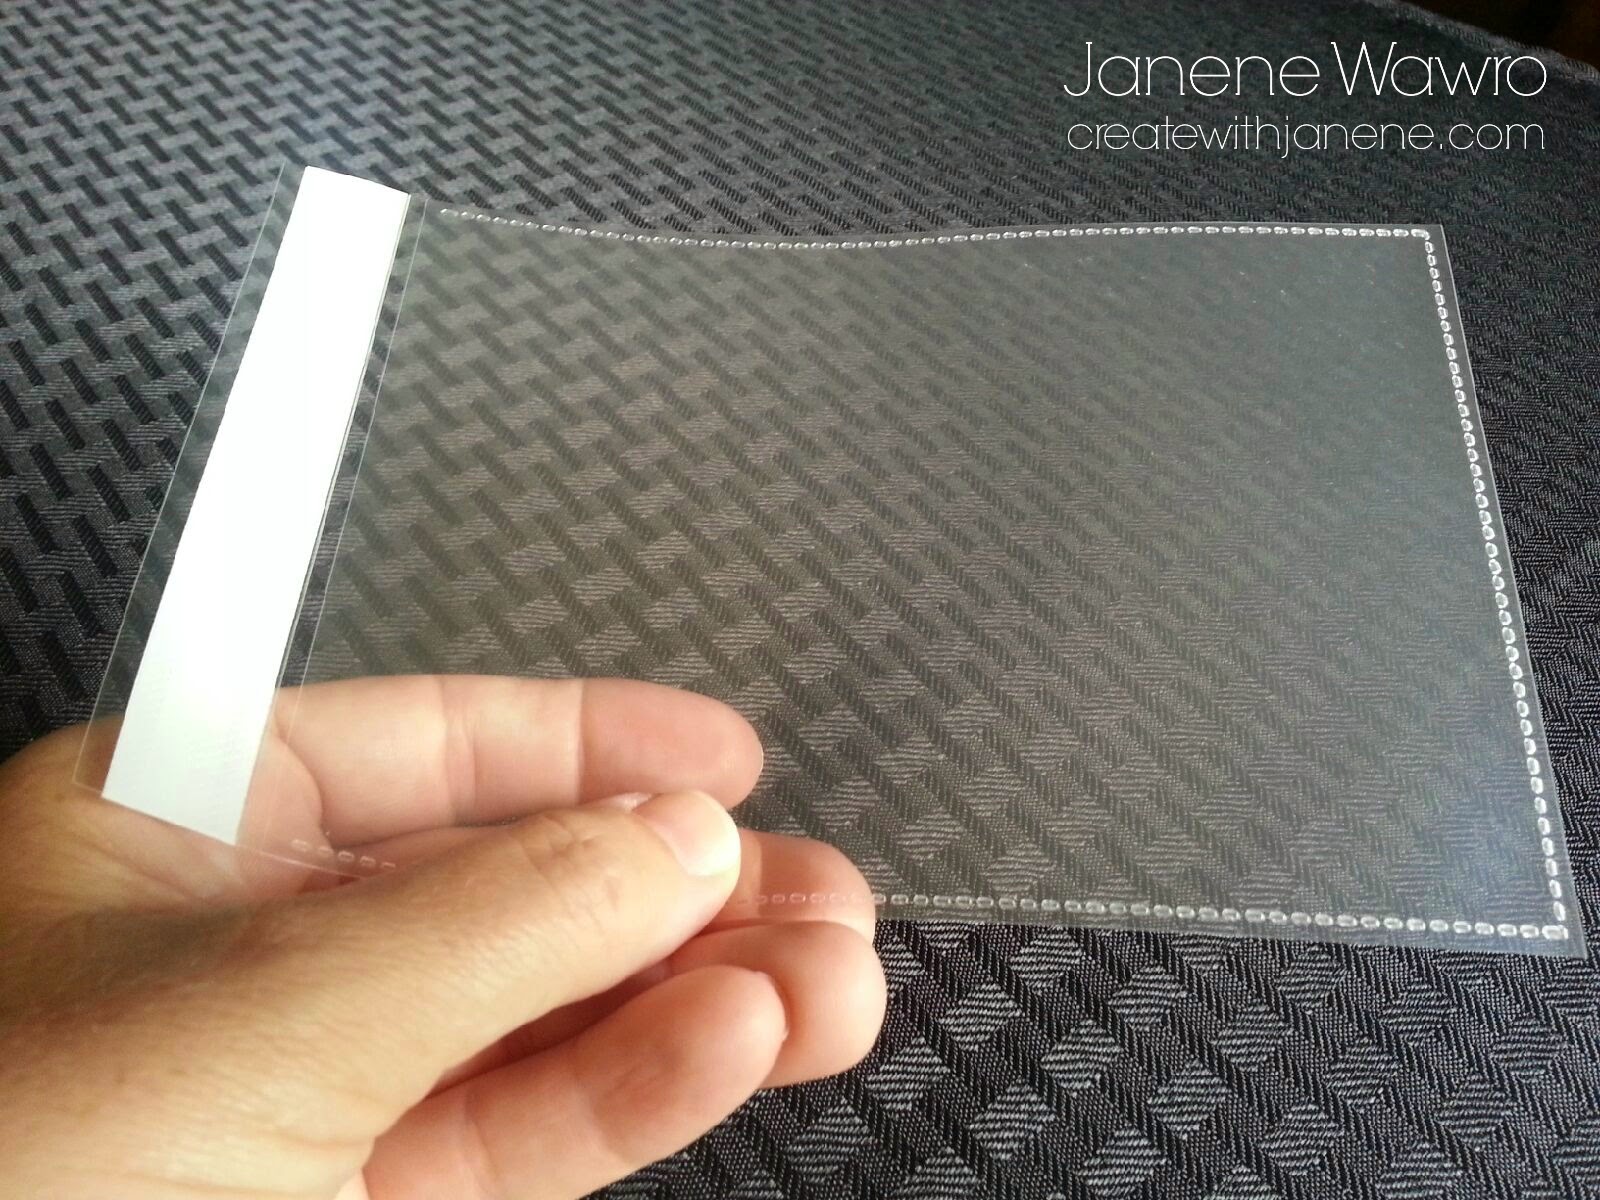
If you'd like to protect the outside flap, you can slide one of our 4x6 "Flip Flaps", found HERE, right over it.  Simply cut off the adhesive strip that you would normally use to adhere extra pictures right to the front of a standard page protector, so that you're just left with the open 4x6 pocket.  See pics below...

4x6 Flip Flap, with white removable strip to reveal clear adhesive beneath.


Two fingers inserted into the clear pocket.


Simply take scissors or a paper trimmer, and cut off the adhesive strip, lining scissors up with the edge of the clear pocket.  This will leave you with a 4x6 pocket, ready to slide onto the outside of your 4x6 interactive piece shown above.  Easy!  For the above layout, you'll need a total of six flip flaps.  These are really inexpensive...only about $.26 each!

Want a quick tip on how to get THREE cards from one sheet of 12x12 paper?  Instead of creating a standard 4-1/4" x 5-1/2" card, make your cards 1/4" smaller, so that the finished size is 4 x 5-1/2.  The easiest way to do this is take a 12x12 sheet of cardstock for the base of your card and cut off just ONE inch to bring it to 11".  Then turn your cardstock to the 12" side, place in your paper trimmer, and cut at 4" to create three 4x11 strips.  Then simply fold them in half at 5-1/2" for your card base.  This is a minor change but makes better use of your paper, and still fits into a standard envelope.

The base of these cards is created using Glacier Blue cardstock from CTMH, found in the 'Blossom' paper packet HERE.   Layer a white piece of cardstock, cut to 3-1/2 x 5 on top of that.  Then embellish using the following products (click each to bring up the link):

Shower Flowers Stamp Set
Stamp Pads:  Smoothie, Honey, Lagoon, Pear, Black
Blossom Complements (chevron border sticker and floral embellishments from the layout shown above)

The Smoothie flower is stamped directly onto the white cardstock, while the Honey flower is stamped on scrap paper, scissor cut out, then adhered with a pop dot over the smoothie flower for dimension.  This is a great five-minute card with clean lines and lots of color.  The Glacier blue chevron border is a sticker - just peel it from the Blossom Complements (link above) cut to the edge of the white cardstock.


Happy creating!  Remember that you can purchase any of the items shown here by clicking the links above.  Shop directly from my website at www.janene.ctmh.com and have your order shipped right to your door!  :)

Want the a 1-page full color handout of these projects?  Includes basic photos and cutting sizes/instruction, for just $3.00.  Simply click the link below to purchase and they will be emailed to you.